Demystifying angular/router: what is `RouterScroller` and why is it useful ?
Table of Contents
This article has been published on indepth.dev.
Introduction
The RouterScroller entity is a very interesting part of the Angular Router. In this post, we’re going to have a look at how it works, what makes its features possible and how it can be configured, depending on the developer’s needs.
It helps us achieve things like scrolling to a fragment, setting an offset for that fragment and, lastly, navigating back to where the browser left off as a result of a popstate event.
How RouterScroller is set up
Files referenced in this section: router_module, router_scroller.
Since the @angular/router is a built-in package provided by Angular, is has to go through a process of initialization, in order to make sure everything is set up correctly. In this case, it happens inside a APP_BOOTSTRAP_LISTENER’s listener. If we peek at the source code, we can see that the first lines of the function’s block are just this.injector.get calls:
const opts = this.injector.get(ROUTER_CONFIGURATION);
const preloader = this.injector.get(RouterPreloader);
const routerScroller = this.injector.get(RouterScroller);
const router = this.injector.get(Router);
const ref = this.injector.get<ApplicationRef>(ApplicationRef);

/* ... */
This might seem trivial at first sight, but some of the arguments provided to this.injector.get are in fact factory tokens, meaning that some piece of logic will run in order to retrieve what has been asked for.
For example, RouterScroller(the article’s focal point) is defined as follows:
{
  provide: RouterScroller,
  useFactory: createRouterScroller,
  deps: [Router, ViewportScroller, ROUTER_CONFIGURATION]
},
createRouterScroller will simply create an instance of the RouterScroller class, based on the ROUTER_CONFIGURATION token. This can be seen in the class’ constructor:
constructor(
    private router: Router,
    public readonly viewportScroller: ViewportScroller, private options: {
      scrollPositionRestoration?: 'disabled'|'enabled'|'top',
      anchorScrolling?: 'disabled'|'enabled'
    } = {}) {
  // Default both options to 'disabled'
  options.scrollPositionRestoration = options.scrollPositionRestoration || 'disabled';
  options.anchorScrolling = options.anchorScrolling || 'disabled';
}
Then, after the Router is initialized (Router.initialNavigation), the RouterScroller will be initialized as well, with RouterScroller.init():
init(): void {
  // we want to disable the automatic scrolling because having two places
  // responsible for scrolling results race conditions, especially given
  // that browser don't implement this behavior consistently
  if (this.options.scrollPositionRestoration !== 'disabled') {
    this.viewportScroller.setHistoryScrollRestoration('manual');
  }

  this.routerEventsSubscription = this.createScrollEvents();
  this.scrollEventsSubscription = this.consumeScrollEvents();
}
The last two lines represent the gist of RouterScroller. We are going to explore them in the following section, along with some examples.
How RouterScroller works
Router events(e.g NavigationStart, NavigationEnd) play an important role in achieving RouterScroller’s features. Scroll events are created based on specific Router events.
private lastId = 0;

/* ... */

private createScrollEvents() {
  return this.router.events.subscribe(e => {
    if (e instanceof NavigationStart) {
      // store the scroll position of the current stable navigations.
      this.store[this.lastId] = this.viewportScroller.getScrollPosition();
      this.lastSource = e.navigationTrigger;
      this.restoredId = e.restoredState ? e.restoredState.navigationId : 0;
    } else if (e instanceof NavigationEnd) {
      this.lastId = e.id;
      this.scheduleScrollEvent(e, this.router.parseUrl(e.urlAfterRedirects).fragment);
    }
  });
}
The browser implementation of ViewportScroller.getScrollPosition() returns [this.window.scrollX, this.window.scrollY];, a tuple that describes the amount of pixels the document is scrolled horizontally and vertically. The e.navigationTrigger defines what trigger this navigation, which might be on of the three:
'imperative'- manually doingrouter.navigate()orrouter.navigateByUrl()'popstate'- clicking the forward or the back button, orhistory.back()/historyForward()'hashchange'- when thefragment(the part prefixed with#) changes
e.restoredState is a very interesting part. Try to imagine the history stack. With every history.pushState(stateObj, title, url), a new item is added to the browser’s history stack. This is what essentially concludes a router navigation. Angular identifies every navigation with a navigationId(as you can see, it’s useful for this.restoredId as well). The navigationId is assigned to a new navigation this way:
const id = ++this.navigationId;

// `setTransition` will push the object through the `Router stream` - a series of operators that have to deal with
// determining the router configuration object, running the guards, setting the browser's URL etc...
this.setTransition({
  id,
  source,
  restoredState,
  currentUrlTree: this.currentUrlTree,
  currentRawUrl: this.rawUrlTree,
  rawUrl,
  extras,
  resolve,
  reject,
  promise,
  currentSnapshot: this.routerState.snapshot,
  currentRouterState: this.routerState
});
When a popstate event occurs, the browser will move to the second uppermost item from the stack, which, as mentioned earlier, has a navigationId property in its state. That navigationId will be the this.restoredId in our case. So, two important things happen when the NavigationStart event occurs:
- we store the current position(
scrollXandscrollY) of the document (with the help oflastId) - we determine(if it exists) the
restoredId, which is thenavigationIdof the previous navigation; notice that it is done only when thepopstateevent takes place
Otherwise, if the NavigationEnd event occurs, only the current navigationId is stored: this.lastId = e.id; and a Scroll event is created:
private scheduleScrollEvent(routerEvent: NavigationEnd, anchor: string|null): void {
  // `router.triggerEvent` will push a new event(`routerEvent`) through the `router.events` stream
  this.router.triggerEvent(new Scroll(
      // so, only if the `popstate` event occurred, the stored position will considered
      // otherwise, the position will be `null`
      routerEvent, this.lastSource === 'popstate' ? this.store[this.restoredId] : null, anchor));
}
Let’s now see how the Scroll events are handled:
// from `init()` method
this.scrollEventsSubscription = this.consumeScrollEvents();

/* ... */

private consumeScrollEvents() {
  return this.router.events.subscribe(e => {
    if (!(e instanceof Scroll)) return;

    // a popstate event. The pop state event will always ignore anchor scrolling.
    if (e.position) {
      if (this.options.scrollPositionRestoration === 'top') {
        this.viewportScroller.scrollToPosition([0, 0]);
      } else if (this.options.scrollPositionRestoration === 'enabled') {
        this.viewportScroller.scrollToPosition(e.position);
      }
      // imperative navigation "forward"
    } else {
      if (e.anchor && this.options.anchorScrolling === 'enabled') {
        this.viewportScroller.scrollToAnchor(e.anchor);
      } else if (this.options.scrollPositionRestoration !== 'disabled') {
        this.viewportScroller.scrollToPosition([0, 0]);
      }
    }
  });
}
The viewportScroller.scrollToPosition, in a browser environment, is simply just: this.window.scrollTo(position[0] /* x */, position[1] /* y */); The logic in this handler can be influenced by some configuration options provided when instantiating the RouterModule(with RouterModule.forRoot(routes, { /* config */ })). We’ll discuss a couple of these options in the next section.
But before going further, let’s get a better understanding of what’s going on by examining a common user flow.
Assuming the user would follow these steps:
- clicks on
go to default - clicks on
go to default/foo - scrolls until
Test from foo - bottom 20%is visible, as well asgo to default/bar - clicks on
go to default/bar
Now, if you click on go back button, you should now see the Test from foo - bottom 20% text:
And here is how the flow could be visualized:
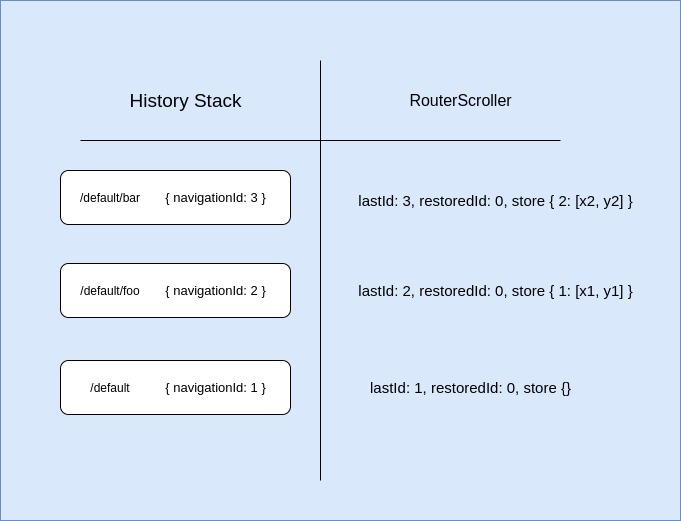
x{n}, y{n} are the scrollX and scrollY values at a certain time when a new navigation is started.
Now, after clicking on the go back button, the RouterScroller’s state becomes:
{
  restoredId: 2, // `navigationId`
  lastId: 2
  /* ... */
}
And by using store[restoredId] we get the coordinates for the previous /default/foo view.
Note: for this demo, the scrollPositionRestoration option has been used: RouterModule.forRoot(routes, { scrollPositionRestoration: 'enabled' })
Router options that concern RouterScroller
From the previous section we’ve seen what the scrollPositionRestoration option does.
Another 2 useful options are anchorScrolling and scrollOffset:
private consumeScrollEvents() {
  return this.router.events.subscribe(e => {
    if (!(e instanceof Scroll)) return;

    // a popstate event. The pop state event will always ignore anchor scrolling.
    if (e.position) {
      if (this.options.scrollPositionRestoration === 'top') {
        this.viewportScroller.scrollToPosition([0, 0]);
      } else if (this.options.scrollPositionRestoration === 'enabled') {
        this.viewportScroller.scrollToPosition(e.position);
      }
      // imperative navigation "forward"
    } else {
      if (e.anchor && this.options.anchorScrolling === 'enabled') {
        this.viewportScroller.scrollToAnchor(e.anchor);
      } else if (this.options.scrollPositionRestoration !== 'disabled') {
        this.viewportScroller.scrollToPosition([0, 0]);
      }
    }
  });
}
As you can notice from the above snippet, by setting the anchorScrolling option to enabled, we can navigate to a particular element that belongs to the new view. The element can be recognized by settings its id attribute:
<h4 id="custom-fragment"><!-- ... --></h4>
and the navigation can be achieved with:
<button routerLink="/default/foo" fragment="custom-fragment"><!-- ... --></button>
Furthermore, when having anchorScrolling enabled, the scrollOffset option might be useful as well. You can play around with it by using: RouterModule.forRoot(routes, { scrollOffset: [xOffset, yOffset] }). To describe it briefly, imagine a Cartesian system xOy, where a coordinate Y is the point where the browser would normally scroll to if there were no offset specified. In fact, the default offset is 0. So, the formula would be: finalOffsetY = Y + yOffset. And the same goes for the X coordinate.
Conclusion
The RouterScroller provides some essentials features of angular/router. We’ve examined how it is set up, the mechanisms that make everything possible and some of the ways it can be configured to suit certain needs.
Thank you for reading!